Preventing Swirl Marks During Mobile Detailing
Table of Contents
- Why Your Mobile Detailer Keeps Leaving Swirl Marks
- The Two-Bucket Wash Method: Your First Defense
- Choosing the Best Microfiber Towels for Detailing
- Mastering Pre-Wash and Drying Techniques
- Mobile-Specific Factors: Water Quality and Environment
- How to Remove Swirl Marks from Car Paint
- Maintaining a Swirl-Free Finish Between Details
- Conclusion: Book Professional Car Care Today
- Frequently Asked Questions
Last Updated: September 5, 2026
Why Your Mobile Detailer Keeps Leaving Swirl Marks
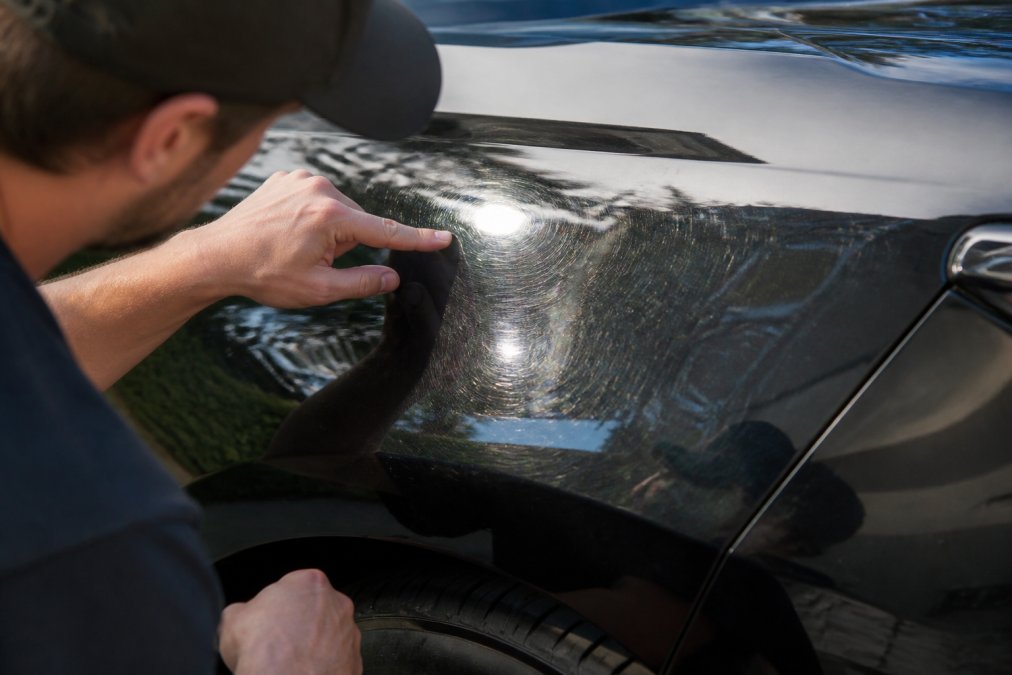
Swirl marks are a network of fine micro-scratches in your clear coat that catch the light and dull your finish. They appear when abrasive particles get dragged across the paint during washing or drying, and mobile detailing environments create perfect conditions for this damage.
The core problem is contamination. A single grain of sand trapped in a wash mitt acts like sandpaper, carving micro-scratches with every pass. Most marring happens not from aggressive chemicals but from friction between dirt and unprotected paint.
What separates a detailer who protects your paint from one who damages it comes down to three pillars: proper wash methodology, quality towel selection, and controlled drying.
The Two-Bucket Wash Method: Your First Defense
The two-bucket wash method is the industry standard for minimizing contamination during contact washing. One bucket holds your soapy solution while the second holds clean rinse water, often fitted with a grit guard to trap sediment. After each panel, you rinse the mitt in the clean bucket before reloading it with suds, ensuring you never drag captured grit back across the paint.
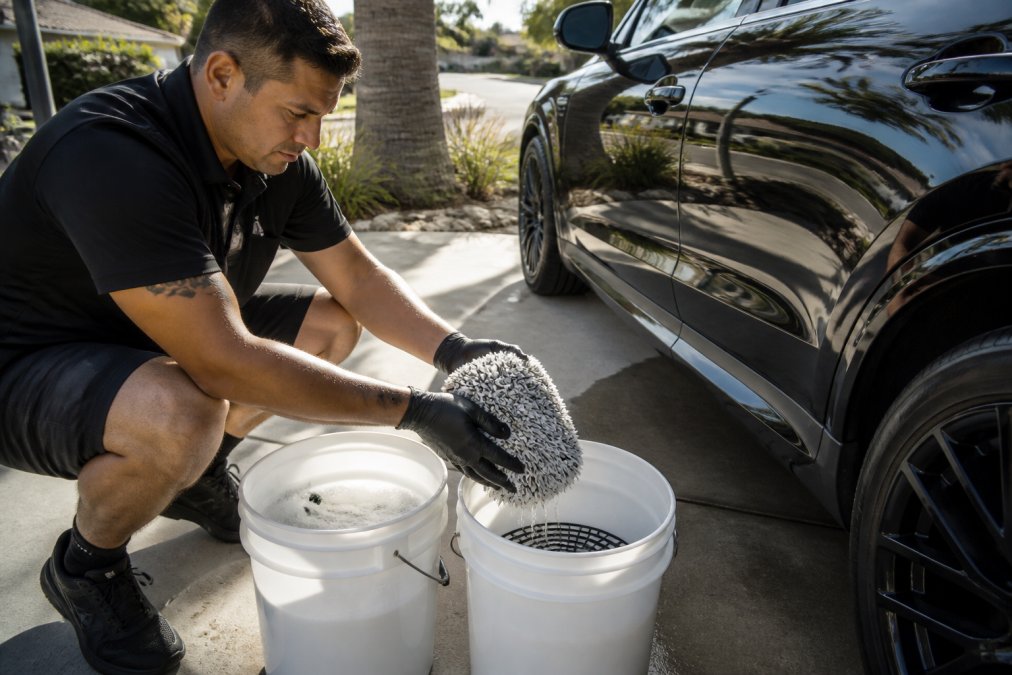
You need two separate buckets, a grit guard in the rinse bucket, and a high-quality wash mitt with deep pile that traps particles away from the paint. A common mistake is using a single bucket and relying on soap suds to lift dirt, which simply recirculates contaminants onto your clear coat.
Microfiber mitts with a chenille or long-loop pile are the safest choice because they hold dirt deep within the fibers rather than pressing it against the paint. Avoid sponges or brushes with stiff bristles, which concentrate pressure and increase the risk of marring on soft clear coats.
The Mobile Execution Gap: What Garage Guides Miss
Mobile detailing diverges from garage-based advice because you lack the controlled environment of a fixed shop. Three mobile-specific factors change how the method must be executed:
1. Bucket stability and contamination. On uneven pavement, buckets tip or splash, and wind-blown debris can land in your clean rinse bucket between dips. A professional setup uses buckets with sealed lids that open only for mitt entry, or positions the rinse bucket downwind of the wash zone. Some detailers use a third bucket exclusively for wheel cleaning, because brake dust contains metallic particles that will instantly mar clear coat if transferred to a body panel mitt.
2. The mitt inspection protocol between panels. The single most effective habit is inspecting the mitt face before every reload. After rinsing, spread the fibers with your thumb and look for embedded grit, hair, or plant matter. A single pine needle fragment or sand grain trapped in the pile will scratch paint on the next pass regardless of how many buckets you use. Professional detailers set aside any mitt that touches the ground and rotate to a fresh mitt after completing the lower panels, which carry the heaviest contamination load.
3. Water temperature and soap chemistry. Mobile detailers often work with water from the customer’s hose, which may be cold or inconsistent. Cold water reduces the effectiveness of many pH-neutral soaps, requiring higher concentrations to maintain adequate lubrication. A common professional practice is to use a foam cannon pre-soak with a higher dilution ratio than the label suggests, ensuring the contact wash has enough slickness to float contaminants off rather than grinding them in.
The Grit Guard Reality Check
Grit guards are effective but not a substitute for mitt maintenance. They trap sediment at the bottom of the rinse bucket but do nothing for debris embedded in the mitt fibers after rinsing. The ridges create turbulence that releases loose particles, yet stubborn contaminants like tar specks require manual removal. Run your fingers through the mitt pile after every few panels to feel for embedded debris, and switch to a clean mitt mid-wash. Most professional detailers carry at least three mitts per vehicle and rotate them based on panel zone.
Never use a mitt that has been dropped on the ground, even if you rinse it thoroughly first. The impact forces grit deep into the pile where it cannot be fully removed by rinsing alone. Set it aside for wheel duty or discard it.
Adapting the Method to Sunlight and Heat
Mobile work frequently happens in direct sunlight, which accelerates soap drying on the panel. If soapy water flash-dries before you rinse it, the surfactants leave a residue that increases friction on the next mitt pass. Professional detailers manage this by working in smaller sections, washing and rinsing one panel at a time rather than soaping the entire vehicle first. They also keep a spray bottle of rinse water or quick detailer nearby to re-wet any area that begins to dry.
When ambient temperatures exceed 85°F, consider switching to a rinse-less wash product diluted in your bucket instead of traditional soap. Rinse-less formulas encapsulate dirt and provide lubrication even in challenging conditions, and they eliminate the flash-drying problem entirely because they do not rely on foam to carry lubricant.
Choosing the Best Microfiber Towels for Detailing
The best microfiber towels for detailing are defined by their GSM rating and edge construction, not just the brand name. For paint contact, you want a GSM of at least 350 to 500, which provides enough plushness to absorb water and lubricant without applying excessive pressure. Higher-density towels also hold more liquid, reducing the number of passes needed across the surface.
Towel quality directly determines whether you introduce new swirl marks during drying. A cheap towel with exposed edges or rough weave can scratch paint even when the wash itself was perfect. Look for towels with a plush, non-abrasive pile and consider a dedicated drying towel with a higher GSM and waffle-weave construction that pulls water off the surface rather than pushing it around.
Never use household towels, terry cloth, or old t-shirts on automotive paint. Their coarse fibers and seams will leave micro-scratches that appear as swirl marks under sunlight. This single mistake undoes all the protection from a proper two-bucket wash.
Mastering Pre-Wash and Drying Techniques
A contact wash should never be your first step, because loose dirt needs to be removed before any towel or mitt touches the paint. A pre-wash stage using a foam cannon or snow foam loosens and encapsulates surface contaminants, allowing them to rinse away with a pressure washer before physical contact begins.
Drying is where most swirl marks are introduced, often because detailers rush or use improper technique. The safest approach is to use a drying aid, a spray lubricant applied to the panel before the towel makes contact. This adds a layer of slickness that lets the towel glide over the paint instead of dragging across it, minimizing friction and preventing micro-scratches.
Blotting is always safer than wiping. Press the drying towel onto the surface to absorb water, then lift it away, rather than dragging it across the panel. For larger areas, work in straight lines rather than circular motions, which are more likely to trap debris and create visible swirl patterns.
The Touchless vs. Contact Decision Framework
Most guides treat pre-wash as a single step, but professional mobile detailers make a deliberate decision before every wash: does this vehicle need a full touchless protocol, or is a contact wash with proper technique sufficient? The answer depends on contamination level and paint condition.
A touchless-only wash, foam cannon application followed by high-pressure rinse, with no mitt contact, is the right choice when the vehicle is heavily soiled with road grime, mud, or sand, or when the paint is unprotected or already showing thin clear coat. In these conditions, any contact carries unacceptable risk. The trade-off is that touchless washing alone cannot remove bonded contaminants like tree sap, tar, or bug residue; those require spot treatment with a dedicated remover before the contact wash begins.
For lightly soiled vehicles with healthy paint protection, a contact wash with a foam cannon pre-soak is safe and more effective at achieving a deep clean. The foam cannon’s role is not just to loosen dirt, it also provides a visual indicator of where you have already washed, preventing you from accidentally re-contacting a dried panel.
Book professional car care today →
If you are unsure whether a vehicle needs touchless or contact wash, run your hand gently over a clean panel after the pre-rinse. If you feel grit or a rough texture, switch to a full touchless protocol or extend your pre-soak dwell time before any mitt touches the paint.
Drying Mechanics: Why Technique Beats Towel Quality
Even the highest-GSM microfiber towel will scratch paint if used with poor technique. Friction between the towel and paint increases as the towel absorbs water and becomes heavier, and any trapped particle is pressed harder against the clear coat. This is why drying aids matter more than towel brand. A spray lubricant applied before the towel makes contact creates a hydrodynamic layer that lifts the towel slightly off the paint, reducing friction and allowing trapped particles to slide rather than dig in.
Professional detailers use a two-towel drying system. The first towel, typically a waffle-weave or twisted-loop microfiber with GSM above 600, absorbs the bulk of the water. The second towel, a plush finishing towel, follows immediately to catch any remaining moisture and buff the surface to a streak-free finish. This second pass is critical because it removes the thin water film that can leave mineral deposits if allowed to air-dry.
Water Quality: The Hidden Variable in Mobile Drying
Mobile detailers face a problem that garage-based guides rarely address: the customer’s water supply. Hard water containing dissolved calcium and magnesium leaves visible mineral spots when it dries on paint, and those spots are not just cosmetic, they can etch into the clear coat over time, creating a hazy appearance that mimics swirl marks under certain lighting.
A professional mobile setup addresses this in one of two ways. The first is a portable deionization (DI) system that removes dissolved minerals before the water touches the paint, allowing spot-free air drying. The second is a drying aid with chelating agents that bind to minerals and prevent them from depositing as the water evaporates. Both approaches work, but they require different drying techniques. With a DI system, you can safely allow water to sheet off and use a blower to remove remaining droplets. Without DI, you must dry each panel immediately after rinsing, before water has a chance to evaporate and leave mineral residue.
The Blower Advantage for Mobile Work
A handheld or backpack blower is one of the most underrated tools for preventing swirl marks in mobile detailing. After the final rinse, a blower removes water from crevices, mirrors, emblems, and panel gaps where towels cannot reach without risk of catching an edge. This eliminates the need to drag a towel across tight areas, which is where most drying-induced marring occurs. Professional detailers use the blower first to remove bulk water, then follow with a drying aid and towel only on large flat panels where the blower is less efficient.
Environmental Timing for Outdoor Drying
The drying phase is the most vulnerable moment in a mobile detail because the paint is wet, unprotected, and exposed to the environment. Wind-blown dust, pollen, and tree sap can settle on a panel in the seconds between rinsing and drying. Professional mobile detailers minimize this window by drying in the same order they washed, starting at the top and working down, and by keeping a spray bottle of rinse water handy to re-wet any panel where contaminants land before the towel arrives. If the wind picks up significantly mid-detail, the safest move is to pause the drying process, re-rinse the affected panels, and resume only when conditions settle.
Mobile-Specific Factors: Water Quality and Environment
Mobile detailing introduces variables that a fixed shop never faces, and water quality is the most overlooked. Hard water containing dissolved minerals leaves deposits that etch into the clear coat if allowed to dry, creating spots that look like swirl marks under certain lighting. A mobile detailer should carry a water filtration or deionization system to ensure spot-free rinsing, or use a drying aid that neutralizes mineral content before it sets.
Environmental control is the second challenge. Working outdoors means dealing with wind-blown dust, pollen, and tree sap that can settle on panels between wash stages. A professional mobile setup accounts for this with faster work sequences and by keeping panels wet until the final drying pass, minimizing the window where contaminants can land on bare paint.
Tool maintenance and inspection matter even more on the road. Wash mitts and towels that are dropped on the ground must be set aside immediately, as they pick up grit that will scratch paint on the next pass. A detailer should inspect their media regularly for embedded debris and replace worn towels before they become a hazard to your automotive finish.
How to Remove Swirl Marks from Car Paint
If swirl marks are already present, washing technique alone will not fix them; the damaged clear coat requires paint correction. How to remove swirl marks from car paint typically involves a machine polisher with a cutting compound that levels the clear coat, removing the thin layer of paint that contains the micro-scratches. This is a precision process that requires the right pad, compound, and technique to avoid burning through the clear coat.
Before attempting any paint correction, verify the clear coat thickness with a paint depth gauge. If the coating is already thin from previous polishing, aggressive correction is risky and a lighter approach or ceramic coating may be the safer path.
For light swirl marks, a single-stage polish with a fine compound may be sufficient. Deeper scratches from years of improper washing may require a two-stage process: a cutting compound to remove the defect, followed by a finishing polish to restore gloss and remove haze left by the cutting pad. After correction, the paint should be protected with a sealant or ceramic coating to reduce future contamination and make washing safer.
Maintaining a Swirl-Free Finish Between Details
Your habits between professional details determine how long the paint stays swirl-free. The most effective maintenance is a rinse-less or waterless wash product designed for light dust and bird droppings, which lubricates the surface enough to safely lift contaminants without a full wash setup. These products are ideal for busy owners who need to freshen the car between scheduled details.
Automatic car washes are the fastest way to reintroduce swirl marks (popularmechanics.com). The nylon brushes and shared towels used by tunnel washes trap grit from thousands of vehicles and drag it across your paint. Even touchless washes that rely on high-pressure chemicals can strip your wax or sealant, leaving the clear coat more vulnerable to future marring.
A simple inspection routine helps you catch problems early. Check the paint under direct sunlight or a bright LED light for new micro-scratches after each wash. If you notice a haze developing, it is time to book a professional correction rather than letting the damage compound. A ceramic coating applied by a professional adds a sacrificial layer that resists scratching and makes routine washing far safer for the underlying clear coat (autogeek.net).
| Maintenance Task | Recommended Frequency | Primary Benefit |
|---|---|---|
| Rinse-less wash with lubricant | Weekly or as needed | Removes light dust without paint marring |
| Full two-bucket contact wash | Every 2-4 weeks | Deep cleaning with minimal swirl risk |
| Professional detail and inspection | Every 3-6 months | Removes embedded contaminants and corrects early damage |
Conclusion: Book Professional Car Care Today
Keeping a flawless finish requires consistency, and the margin for error is small when you are working with soft clear coats and abrasive environments. The techniques above protect your paint between professional appointments, but they demand time, the right products, and disciplined execution every single wash.
That is where Clean Image 101 earns its place. Our mobile service brings skilled professionals to your driveway with the correct two-bucket setup and high-GSM microfiber towels, so your paint never meets a contaminated mitt. From sports cars to minivans, we tailor our process to your vehicle’s specific finish, handling everything from bug removal to full paint restoration without you lifting a finger.
Get started with Clean Image 101 and let our team handle the swirl-free maintenance your car deserves, right at your home or office.
Frequently Asked Questions
Does a ceramic coating prevent swirl marks?
A ceramic coating adds a sacrificial layer of protection, making the surface slicker and more resistant to minor abrasions. It helps reduce the risk of micro-scratches, but it does not make the paint immune. Swirl marks can still occur if you use improper washing techniques, dirty towels, or automatic car washes. The coating protects the clear coat, not from it. Proper maintenance is still essential.
What is the two-bucket method for washing cars?
The two-bucket method uses one bucket for soapy water and a second for clean rinse water. After a few swipes on the paint, you rinse your wash mitt in the clean bucket. This action releases trapped dirt particles into the rinse bucket instead of back onto your paint. A grit guard in the rinse bucket further traps contaminants. This simple habit dramatically reduces the chance of creating new swirl marks.
Can detailing remove swirl marks?
Yes. Swirl marks are micro-scratches in the clear coat. Professional paint correction uses a machine polisher with an abrasive compound to level the clear coat and remove the scratches. Light swirl marks may be removed with a fine polish, while deeper ones require a more aggressive cutting compound. This process is best left to professionals, as using too much pressure or the wrong pad can damage the paint.
How do I know my detailer won’t scratch my paint?
Ask about their process. A professional detailer should discuss their approach, including the type of wash mitts, the two-bucket method, and the condition of their microfiber towels. Inquire if they use grit guards and how often they replace their towels. A reputable detailer will be transparent about their techniques to protect your vehicle’s finish and will use fresh, clean equipment for each job.
Comments are closed.